こんにちは、素人エンジニアです。
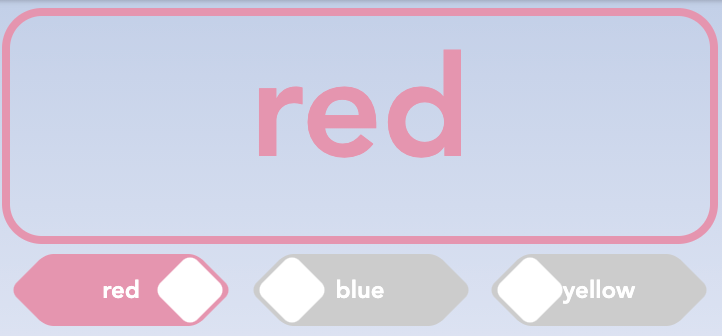
CSSで、ラジオボタンのチェックが入ると色が変わるようなデザインを作りました。
少しtransformとtransitionを使って、動きも加えています。
↓↓↓↓ぜひクリックしてください↓↓↓↓
https://codepen.io/doncha2525/pen/ZEBxXqj
ラジオボタンは、divタグに囲んだinputとlabelで構成されています。
<div class="radio-box">
  <input type="radio" id="red" name="color" value="red" checked>
  <label for="red" class="is-red"><p>red</p></label>
</div>
ボタン左右の<>みたいな形は、ラベルの疑似要素であるbeforeとafterで表現しました。
位置の調整が難しかったです…..
.radio-box label::before{
  content: "";
  position: absolute;
  left: 7px;
  top: 5px;
  width: 26px;
  height: 26px;
  border-radius: 20%;
  background: #ccc;
  transform: rotate(45deg);
  transition: all 600ms cubic-bezier(1, 0, 0, 1);
  z-index: 101;
}

.radio-box label::after {
  content: "";
  position: absolute;
  right: 7px;
  top: 5px;
  width: 26px;
  height: 26px;
  border-radius: 20%;
  background: #ccc;
  transform: rotate(45deg);
  transition: all 600ms cubic-bezier(1, 0, 0, 1);
  z-index: 101;
}
ラジオボックスのチェックを表しているのは、ラベルのbackgroundとpタグの疑似要素とです。
inputタグがcheckedの時に、その色の背景に切り替えています。
.radio-box input[type="radio"]:checked + label.is-red,
.radio-box input[type="radio"]:checked + label.is-red::before,
.radio-box input[type="radio"]:checked + label.is-red::after {
  background: rgb(230, 148, 176);
}
同時に、白四角を回転させながら右に移動させています。
白四角は、pタグの疑似要素で作りました。
.radio-box p::before {
  content: "";
  position: absolute;
  left: 10px;
  top: 5px;
  width: 26px;
  height: 26px;
  border-radius: 20%;
  background: #fff;
  transform: rotate(45deg);
  transition: all 600ms cubic-bezier(1, 0, 0, 1);
  z-index: 103;
}
rotateで回転させながらゆっくり動かすと、チェックした感が増します。
.radio-box input[type="radio"]:checked + label>p:before {
  left: 100%;
  margin-left: -36px;
  transform: rotate(225deg);
}
以上!
ざっくり説明しましたが、私の知識を残すためにも別途詳細をまとめようと思います。
未来の私に期待….


コメント